Description
If you’re looking for a homemade bread that’s soft enough for sandwiches yet packed with the rich flavor of sourdough, this Sourdough Sandwich Bread is the perfect recipe. Unlike traditional artisan sourdough with its thick crust and chewy texture, this loaf is light, tender, and slices beautifully for everyday meals.
Made with an active sourdough starter, milk, butter, and a touch of sugar, this bread has a delicate crumb, a golden crust, and just the right balance of flavor. Whether you’re preparing school lunches, breakfast toast, or grilled cheese sandwiches, this versatile loaf is sure to become a household favorite.
Why You’ll Love This Sourdough Sandwich Bread
- Naturally leavened with an active sourdough starter
- Soft, fluffy texture perfect for sandwiches
- Mild sourdough flavor the whole family will enjoy
- Easy to slice without crumbling
- Stays fresh for several days
- Great for beginners learning sourdough baking
- Delicious for toast, French toast, and grilled sandwiches
Who Is This Recipe For?
This recipe is ideal for:
- Home bakers wanting a softer alternative to artisan sourdough
- Families who enjoy homemade sandwich bread
- Beginners working with an active sourdough starter
- Anyone looking to reduce store-bought bread
- Meal preppers who appreciate bread that freezes well
If you love baking from scratch but prefer a loaf that’s practical for everyday use, this recipe is an excellent choice.
Why It’s Great
This sourdough sandwich bread combines the health benefits of natural fermentation with the soft texture most people expect from classic sandwich bread.
The addition of milk and butter helps produce a moist, tender crumb, while the sourdough starter develops a deeper flavor without becoming overly tangy. The result is a loaf that’s easy to work with, slices evenly, and stays soft longer than many homemade breads.
Ingredients
For the Dough
- 500 g bread flour (or all-purpose flour)
- 100 g active sourdough starter (fed and bubbly)
- 250 ml lukewarm milk or water
- 30 g softened butter
- 25 g granulated sugar (optional)
- 10 g salt
Kitchen Equipment Needed
You’ll need the following tools:
- Large mixing bowl
- Kitchen scale
- Dough scraper (optional)
- Standard loaf pan
- Clean kitchen towel or plastic wrap
- Cooling rack
How to Make Sourdough Sandwich Bread
Step 1: Prepare the Dough
In a large mixing bowl, stir together the active sourdough starter, lukewarm milk, and sugar until mostly combined.
Add the flour and mix until a shaggy dough forms. Incorporate the softened butter and salt, then continue mixing until everything comes together into a soft dough.
Step 2: Knead
Transfer the dough to a lightly floured work surface.
Knead for about 8–10 minutes until it becomes smooth, elastic, and slightly tacky.
If necessary, dust with a small amount of flour, but avoid adding too much to keep the bread soft.
Step 3: First Rise (Bulk Fermentation)
Place the dough into a lightly greased bowl and cover.
Allow it to ferment at room temperature for 4–6 hours.
Every hour during fermentation, perform a series of stretch-and-folds to strengthen the gluten and improve the loaf’s structure.
By the end of this stage, the dough should appear airy and noticeably puffed.
Step 4: Shape the Dough
Turn the dough onto a lightly floured surface.
Gently flatten it into a rectangle before rolling it tightly into a log.
Pinch the seam closed to maintain surface tension, creating a smooth, evenly shaped loaf.
Step 5: Pan the Dough
Grease a standard loaf pan.
Place the shaped dough seam-side down inside the pan and cover loosely.
Step 6: Final Proof
Let the dough rise for 2–4 hours, depending on room temperature and the activity of your starter.
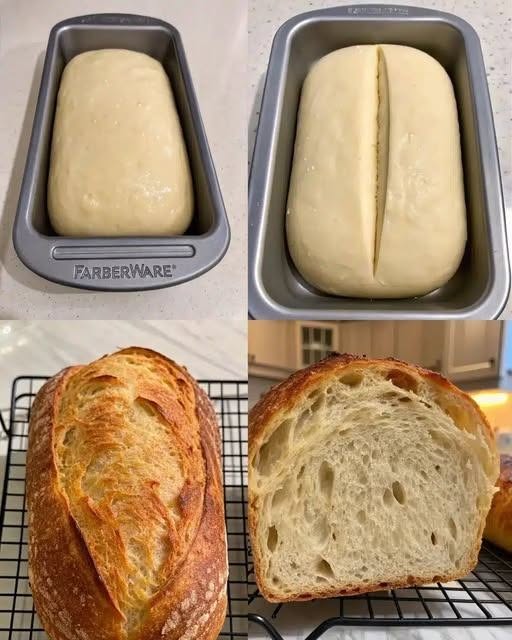
The dough is ready when it has expanded to just above the edge of the loaf pan and feels light and airy.
Avoid letting it over-proof, as this may reduce oven spring.
Step 7: Bake
Preheat your oven to 180°C (350°F).
Bake for 30–35 minutes until the loaf develops a rich golden-brown crust.
The bread is fully baked when:
- The crust is evenly browned.
- It sounds hollow when tapped.
- The internal temperature reaches about 95°C (203°F).
If the crust browns too quickly, loosely tent the loaf with foil during the final minutes of baking.
Step 8: Cool
Remove the loaf from the pan after 5 minutes.
Transfer it to a wire rack and allow it to cool completely before slicing.
Waiting until the bread has cooled helps preserve its soft texture and prevents a gummy crumb.
Serving Ideas
This bread is perfect for:
- Homemade sandwiches
- Breakfast toast
- Avocado toast
- Peanut butter and jam
- Grilled cheese
- French toast
- Garlic bread
- Butter and honey
Helpful Baking Tips
- Feed your sourdough starter several hours before baking for the best rise.
- Bread flour provides a slightly taller loaf with better structure.
- Give the dough enough fermentation time to develop flavor.
- Shape the dough tightly for even slices.
- For deeper sourdough flavor, refrigerate the shaped loaf overnight before baking.
Storage
Room Temperature
Store the cooled loaf in an airtight bread bag or sealed container for up to 4 days.
Refrigerator
Refrigeration is generally not recommended because it can cause homemade bread to dry out more quickly.
Freezer
Slice the loaf before freezing.
Place the slices in a freezer-safe bag and freeze for up to 3 months. Toast individual slices directly from frozen whenever needed.
Frequently Asked Questions
Can I use all-purpose flour?
Yes. Bread flour creates a slightly chewier texture and better rise, but all-purpose flour also works well.
How do I know if my sourdough starter is ready?
A healthy starter should double in size after feeding, appear bubbly, and have a pleasantly tangy aroma.
Why is my bread dense?
Common causes include an inactive starter, insufficient kneading, or not allowing enough time for fermentation and proofing.
Can I proof the dough overnight?
Absolutely. Refrigerating the shaped loaf overnight develops a richer flavor and often improves the crumb.
Can I freeze this bread?
Yes. Freezing sliced bread makes it easy to thaw or toast individual portions whenever you need them.
Conclusion
Making your own Sourdough Sandwich Bread is a rewarding way to enjoy fresh, homemade bread with incredible flavor and texture. This recipe produces a loaf that’s soft enough for everyday sandwiches while still offering the distinctive taste that makes sourdough so popular.
Whether you’re preparing breakfast toast, packing lunches, or serving warm slices alongside dinner, this versatile bread is sure to become a staple in your kitchen. Once you experience the aroma and flavor of freshly baked sourdough sandwich bread, you’ll understand why so many home bakers never go back to store-bought loaves