Description
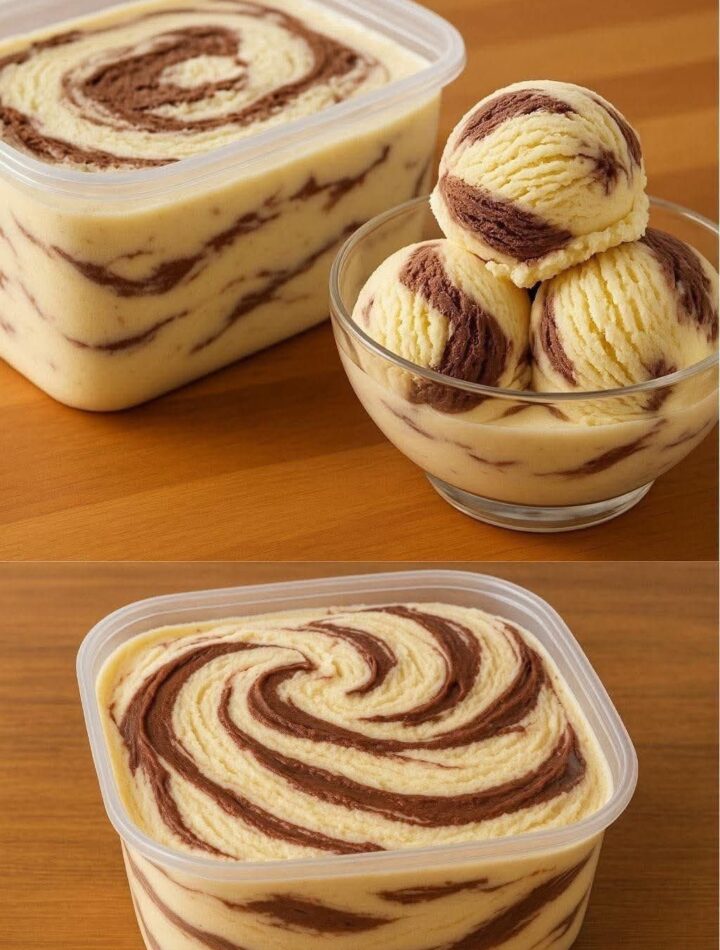
Homemade ice cream doesn’t have to be complicated. This Easy Homemade Ice Cream recipe uses a simple no-churn technique to create a rich, creamy dessert without needing an ice cream machine. With just a few ingredients and minimal preparation, you can make smooth vanilla ice cream beautifully swirled with decadent chocolate.
The secret to this recipe is whipped heavy cream combined with sweetened condensed milk, creating a soft, airy base that freezes into a perfectly scoopable texture. A quick chocolate swirl adds flavor and visual appeal, giving every bite a delicious balance of vanilla and chocolate.
Whether you’re making dessert for a family dinner, hosting friends, or simply craving something cold and sweet, this homemade ice cream is an easy and satisfying treat that tastes even better than store-bought versions.
Ingredients
Ice Cream Base
- 2 cups cold heavy cream (36% fat or higher)
Creates the rich and fluffy structure of the ice cream. - 1 can (14 oz) sweetened condensed milk
Adds sweetness and prevents the ice cream from becoming icy. - 2 teaspoons pure vanilla extract
Provides classic vanilla flavor and aroma.
Chocolate Swirl
- ¼ cup unsweetened cocoa powder
- 2 tablespoons granulated sugar
- 3 tablespoons whole milk or half-and-half
- Pinch of salt (optional)
Enhances the chocolate flavor.
Step-by-Step Instructions
1. Whip the Cream
Place the cold heavy cream in a large mixing bowl. Using an electric mixer or whisk, beat the cream until stiff peaks form. The cream should hold its shape when the whisk is lifted.
2. Prepare the Sweet Base
In a separate bowl, mix the sweetened condensed milk with 1 teaspoon of vanilla extract until smooth.
3. Combine the Mixture
Gently fold the condensed milk mixture into the whipped cream using a spatula. Fold slowly to keep the mixture light and airy. This forms your vanilla ice cream base.
4. Make the Chocolate Swirl
In a small bowl, combine cocoa powder, sugar, milk, the remaining vanilla extract, and a pinch of salt. Warm the mixture briefly in the microwave for about 15–20 seconds, then whisk until smooth and glossy.
Let the chocolate sauce cool slightly.
5. Assemble the Ice Cream
Pour half of the vanilla ice cream mixture into a freezer-safe container and spread evenly.
Drizzle half of the chocolate sauce over the top.
Add the remaining vanilla mixture and spread gently. Finish by drizzling the remaining chocolate sauce.
6. Create the Swirl
Using a knife or spoon handle, gently swirl the chocolate through the ice cream to create a marbled effect. Avoid overmixing so the swirl stays visible.
7. Freeze
Cover the container tightly with plastic wrap or an airtight lid. Freeze for 6–8 hours or overnight until firm.
8. Serve
Remove the ice cream from the freezer and allow it to soften for 5–10 minutes before scooping.
Who Is This Recipe For?
This easy ice cream recipe is perfect for:
- Beginners who want to make homemade desserts without special equipment
- Families looking for a fun kitchen activity with kids
- Dessert lovers who enjoy creamy no-churn ice cream
- Anyone craving quick homemade sweets with minimal ingredients
- People who want a better alternative to store-bought ice cream
Because it requires no ice cream maker, it’s ideal for anyone with basic kitchen tools.
Why It’s Great
There are many reasons this recipe is a favorite:
No Ice Cream Machine Required
You only need a bowl, whisk, and freezer.
Simple Ingredients
Everything can be found in most grocery stores.
Rich and Creamy Texture
The whipped cream base makes the ice cream light and smooth.
Customizable
You can easily add fruit, nuts, caramel, or cookie pieces.
Perfect for Any Occasion
Serve it after dinner, at parties, or as a refreshing summer dessert.
Kitchen Equipment Needed
You only need basic kitchen tools:
- Large mixing bowl
- Electric mixer or hand whisk
- Rubber spatula
- Small microwave-safe bowl
- Whisk
- Freezer-safe container (loaf pan or airtight container)
- Knife or spoon handle for swirling
Storage
Freezer Storage
Store the ice cream in an airtight container in the freezer.
Shelf Life
Homemade ice cream stays fresh for about 2–3 weeks when properly stored.
Preventing Ice Crystals
Press plastic wrap directly onto the surface of the ice cream before sealing the container. This helps prevent freezer burn.
Softening Before Serving
Since homemade ice cream freezes harder than commercial brands, let it sit at room temperature for 5–10 minutes before scooping.
FAQ
Can I make this recipe without an ice cream maker?
Yes. This recipe is specifically designed as a no-churn ice cream, so no machine is required.
Why is my ice cream icy instead of creamy?
This usually happens if:
- The cream wasn’t whipped enough
- The mixture was overmixed
- The container wasn’t sealed properly in the freezer
Can I add other flavors or mix-ins?
Absolutely. Some popular options include:
- Crushed cookies
- Chocolate chips
- Fresh berries
- Caramel sauce
- Toasted nuts
How long does it take to freeze?
The ice cream needs at least 6–8 hours, but freezing overnight gives the best texture.
Can I make it dairy-free?
This specific recipe relies on heavy cream and condensed milk. For a dairy-free version, you would need coconut cream and sweetened condensed coconut milk.
Conclusion
This Easy Homemade Ice Cream proves that making ice cream at home can be simple, fun, and incredibly rewarding. With its creamy vanilla base and rich chocolate swirl, this no-churn dessert delivers gourmet flavor with minimal effort.
Perfect for beginners and experienced cooks alike, this recipe offers a quick way to enjoy fresh, homemade ice cream anytime. Once you try it, you’ll discover just how easy it is to create your own frozen dessert masterpiece right in your kitchen.