
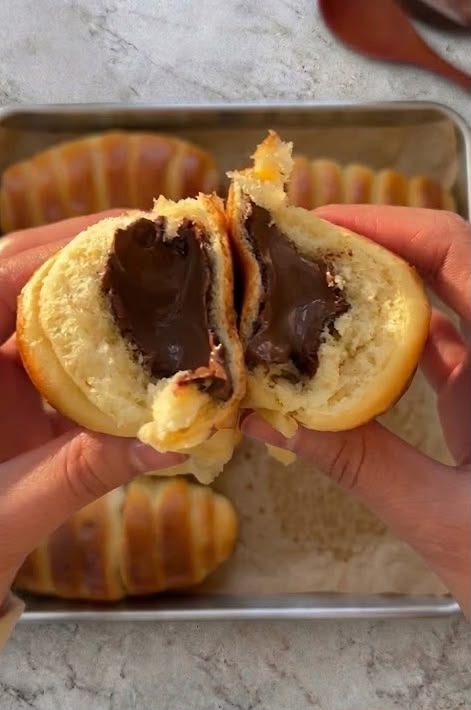
This Chocolate Milk Bread is a soft, fluffy homemade bread with a beautiful two-tone chocolate design. The dough is divided into two portions, with one half transformed into a rich cocoa dough before both doughs are combined and shaped into elegant chocolate-filled triangles.
After baking, the bread develops a lightly golden exterior while staying soft and tender inside. A little butter brushed over the warm bread gives it a delicious finish and helps keep the crust soft.
This easy chocolate bread is perfect for breakfast, an afternoon snack, or a homemade treat with coffee, tea, or a glass of milk.
Who Is This Recipe For?
This chocolate milk bread is ideal for:
- Home bakers who enjoy homemade bread
- Beginners looking for a fun bread recipe
- Families wanting a sweet breakfast treat
- Chocolate lovers
- Anyone who enjoys soft, bakery-style milk bread
Why You’ll Love This Chocolate Milk Bread
- Soft and fluffy texture thanks to milk and butter.
- Beautiful two-color appearance from the plain and cocoa dough.
- Chocolate flavor without making the bread overly sweet.
- Fun shaping technique creates attractive bread rolls.
- Perfect for breakfast or snacks.
- Easy ingredients that are commonly available in most kitchens.
Ingredients
- 1 teaspoon active dry yeast
- 2 tablespoons granulated sugar
- 270 g milk, about 1 cup + 2 tablespoons, lukewarm
- 380 g all-purpose flour, about 3 cups
- 1 teaspoon salt
- 43 g softened butter, about 3 tablespoons
- 2 tablespoons unsweetened cocoa powder
- 1 teaspoon milk, for the chocolate dough
- Chocolate chips, as needed
- Chocolate spread, about 1 tablespoon per portion
- Extra milk, for brushing
- Extra butter, for brushing after baking
Kitchen Equipment Needed
- Large mixing bowl
- Measuring cups and spoons
- Kitchen scale
- Rolling pin
- Baking tray
- Parchment paper
- Pastry brush
- Clean kitchen towel
How to Make Chocolate Milk Bread
Step 1: Prepare the Dough
Add the yeast, sugar, and lukewarm milk to a large mixing bowl. Stir to combine.
Add the flour and mix until a rough dough begins to form. Add the salt and softened butter.
Continue kneading or folding the dough until the butter is completely incorporated and the dough becomes smooth and elastic.
Step 2: Make the Chocolate Dough
Divide the dough into two equal portions.
Leave one portion plain and cover it so it doesn’t dry out.
Place the second portion back into the mixing bowl. Add the cocoa powder and about 1 teaspoon of milk.
Knead until the cocoa is evenly distributed and the dough has a consistent chocolate color.
Cover both portions of dough and let them rise in a warm place for approximately 2 hours, or until they have doubled in size.
Step 3: Combine the Two Doughs
Once the dough has risen, lightly flour your work surface.
Flatten the plain dough into a large, even piece.
Shape the chocolate dough into a ball and place it in the center of the plain dough.
Carefully wrap the plain dough around the chocolate dough, sealing it completely.
Step 4: Roll Out the Dough
Using a rolling pin, gently roll the combined dough into a larger round or oval shape.
Try to roll it evenly without pressing too aggressively, so the two dough layers remain visible.
Step 5: Add Chocolate and Shape the Bread
Sprinkle chocolate chips over the surface.
Cut the dough into 6 triangular sections, similar to the shape used for making croissants.
Spread approximately 1 tablespoon of chocolate spread over each triangle.
Starting from the wider end of each triangle, roll the dough toward the pointed end.
This creates a croissant-style shape with the chocolate filling tucked inside.
Step 6: Let the Bread Rest
Arrange the shaped pieces on a baking tray lined with parchment paper.
Cover loosely with a clean towel or plastic wrap and let them rest for approximately 15 minutes.
Before baking, lightly brush the tops with milk.
Step 7: Bake
Preheat the oven to 355°F (180°C).
Bake the chocolate milk bread for approximately 30 minutes, or until the outside is beautifully golden brown and the bread is fully baked.
Oven temperatures can vary, so keep an eye on the bread toward the end of baking.
Step 8: Finish With Butter
Remove the bread from the oven.
While it is still warm, lightly brush the surface with butter.
Cover the bread loosely with a clean kitchen towel and allow it to cool until warm.
This helps keep the crust soft and gives the finished bread a delicious buttery aroma.
Tips for the Best Chocolate Milk Bread
- Make sure the milk is lukewarm, not hot, before mixing it with the yeast.
- Use softened butter so it incorporates easily into the dough.
- Give the dough enough time to rise. The first rise should continue until the dough has approximately doubled in size.
- Don’t add too much flour while shaping, as excess flour can make the finished bread less soft.
- Keep the dough covered whenever you’re not working with it.
- For a stronger chocolate flavor, use good-quality unsweetened cocoa powder.
- Brush the bread with butter immediately after baking for a softer, more flavorful crust.
Serving Suggestions
Enjoy this chocolate milk bread warm with:
- Coffee
- Tea
- Hot chocolate
- A glass of cold milk
- Fresh fruit
- Extra chocolate spread
- Peanut butter
It also makes a delicious addition to a weekend breakfast or brunch table.
Storage
Store leftover chocolate milk bread in an airtight container or tightly wrapped at room temperature for up to 2–3 days.
For longer storage, freeze the baked bread in a freezer-safe bag or container for up to 2 months.
To serve, let it thaw at room temperature and warm it gently in the oven or microwave.
FAQ
Can I use instant yeast instead of active dry yeast?
Yes. Instant yeast can generally be used in the same type of bread recipe, although the preparation method may differ slightly depending on the brand.
Why didn’t my dough rise?
The yeast may not have been active, the milk may have been too hot or too cold, or the dough may have been kept in a particularly cool environment. Give the dough enough time in a warm, draft-free place.
Can I add more chocolate?
Absolutely. You can add additional chocolate chips or a little more chocolate spread if you prefer a richer chocolate filling. Avoid adding so much filling that it becomes difficult to roll the dough.
Can I prepare the dough ahead of time?
Yes. The dough can be prepared ahead and refrigerated, provided it is properly covered. Allow it to warm up and continue rising as needed before shaping and baking.
How do I keep the bread soft?
Avoid overbaking it and brush the warm bread with butter immediately after removing it from the oven. Storing it in an airtight container also helps maintain its soft texture.
Conclusion
This Chocolate Milk Bread is a fun homemade baking project that combines soft milk bread with rich cocoa dough, chocolate chips, and a delicious chocolate filling. The attractive two-tone design makes it look special, while the simple ingredients make it achievable for home bakers.